Showing posts with label veggies. Show all posts

3/8/10

kimchi

also gimchi, kimchee, or kim chee

a traditional condiment in Korea. thanks to the heritage of my mother-in-law, i was introduced to this wonderfully healthy food many years ago and with some perserverance and practice, i've come to perfect my own recipe which tastes 'almost as good as mom's' according to my adoring husband (and children).

most of this is done by taste and site, but i've attempted to put measurements on everything to help you get started. if you're just not sure how it should taste, drop by the Asian market and pick up a small jar and try it. most often these are already sour, but good. we like ours fresh through sour and thus enjoy making our own.

you'll need:

*large bowl with sealable lid
*1 gallon GLASS jar
(fermented foods should never be stored in plastic or metal containers.)

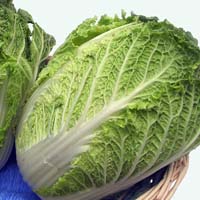
*3 small to medium heads nappa (baechu/Chinese) cabbage (5 lbs)
*5-10 chopped scallions
*sea salt (table or pickling may be substituted)

*1/2 cup of Korean red pepper flakes (kochu karu)
--may substitute the cheap ground red pepper from the Walmart.
i've known some to substitute cayenne, but it's a different flavor and it's much hotter, so the amounts would be significantly less.

*3 tablespoons minced garlic
*½ - 1 tablespoon sugar

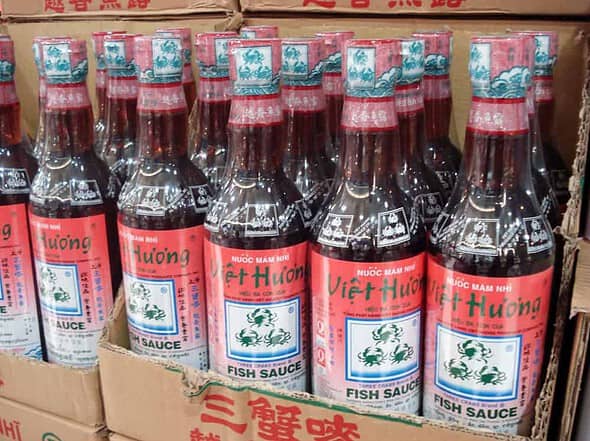
*1 tablespoon kimchi sauce (also called fish sauce/nuoc mam) optional

*½ tablespoon
*minced ginger root (very strong flavor – i leave this out)

*surgical type gloves to protect hands from hot pepper (spoon may be used)


~cut cabbage into 1-2 inch squares.
(this is preference, many cut in strips or leave heads intact and merely slice them lengthwise like a banana peel.)

~spread a layer in large bowl and sprinkle with sea salt.
~continue layers of cabbage and salt until all cabbage is in bowl.
~put lid on bowl and let cure for about until cabbage is limp and will not snap when you try to break it in two (about 2-3 hours).
~r
inse 3-4 times thoroughly and drain DO NOT SQUEEZE.
~taste and if too salty, rinse and drain again.
~salt again to taste (if needed).
~add all other ingredients and mix with gloved hand.

NOTE: add hot pepper a little at a time until desired hot. i've practiced with this and we like 1/2 cup but you might like a little less. if you don't add enough, when the cabbage sours, "sour" is all you will taste.

~put in smallest jar possible and cover.
~refrigerate and serve.

NOTE: flavor is best after at least 24 hours to allow flavors to mix. refrigeration is not necessary for preservation if veggies were cured correctly (if it molds, revisit your curing/salting methods); however, leaving it out at temps above that of your fridge will speed up fermentation and thus will make it sour much more quickly. we prefer to eat it fresh and at all stages of fermentation until it just gets too sour to stand the smell. at this point, we grind it up and throw it in the mondu (recipe to be posted later) or we cook it with some chicken.

3/7/10

cucumber kimchi

cucumber (oisobagi) kimchi

*6 small cucumbers peeled and sliced (keep seeds)
--peeling is optional, but my husband prefers it peeled.

*4-8 green onions chopped
*sea salt (may substitute table or pickling salt)
*6 cloves minced garlic
*1 tablespoon Korean hot sauce (see this post for more info)
-- may substitute smaller amount Korean red pepper flakes (kochu karu) or the cheap ground red pepper from the Walmart. i've known some to substitute cayenne, but it's a different flavor and it's much hotter, so the amounts would be significantly less.

*1 tablespoon white vinegar
*roasted sesame seeds (see this post for how to roast your own)
*surgical type gloves to protect hands from hot pepper (may use spoon, but hands work best)

~sprinkle cucumber slices with salt and mix thoroughly. let stand until cucumbers are limp and will not snap when you try to break it in two..(approx 15-45 minutes).
~rinse well, squeeze, drain, repeat.
~taste to make sure not too salty. if still salty rinse and drain again.
~mix in all other ingredients with gloved hand thoroughly (salt to taste).

NOTE: if using hot pepper instead of paste add 1/2 teaspoon at a time until kimchee reaches desired hot (light orange color).

~put in smallest glass jar possible and cover.
~refrigerate and serve.

NOTE: flavor is best after at least 24 hours to allow flavors to mix. refrigeration is not necessary for preservation if veggies were cured correctly (if it molds, revisit your curing/salting methods); however, leaving it out at temps above that of your fridge will speed up fermentation and thus will make it sour much more quickly. we prefer to eat it fresh and at all stages of fermentation until it just gets too sour to stand the smell. at this point, we grind it up and throw it in the mondu (recipe to be posted later).

makes about 1 quart.

3/4/10

groovy green beans


i love these things. i've tried a dozen different ways and they are all wonderful and healthy too!

all the measurements below are for one person, cuz nobody else in my family eats these.

be brave and try substitutions. i've tried several and truly, if you cook the beans right, everything else is just grand.


4 oz frozen green beans (about 1/3 bag)
3 slices of bacon chopped OR 4 oz chicken breast chopped OPTIONAL
2 tablespoons tallow, butter or olive oil (if you don't use bacon)
1/4-1/2 tsp toasted sesame seeds (could sub sesame oil for oil and seeds)
2 tablespoons FRANK'S® hot sauce
salt and pepper to taste
Parmesan cheese
1/2-1 cup shredded cheese (i've used taco flavored, sharp cheddar and mozzarella) OPTIONAL
1/2 medium yellow onion sliced or chopped bite size
1 clove garlic chopped

if using bacon, cook with onions until bacon is almost done.
if using chicken, heat fat in pan. add onions and chicken and cook until chicken is almost done.
if no meat is used heat oil in pan (meat flavored is best for maximum yumminess)

add green beans. add garlic, sesame seeds, FRANK'S® hot sauce, salt and pepper. mix well and allow to cook until beans are desired tenderness (3-6 minutes). sprinkle Parmesan over entire dish. add cheese if desired and cover for a minute or two to allow the cheese(s) to melt.

that's it! i've considered adding mushrooms, but haven't yet. the picture is what it looks like with chicken in it. they all taste the same and yet different and did i mention--tasty?

enjoy!

2/19/10

TGIFridays spinach dip clone

tonight i got a hankerin' for TGIFriday's tuscan spinach dip. love, love, love the stuff. the frozen from the store stuff is OK, but it's a bit on the greasy side and tooooooo many bad preservatives, so i finally decided to make my own. couldn't get TGIFriday's to give me their recipe...lol, so i searched around the net and found a couple of recipes, did a bit of juggling and came up with a hit!

this stuff was fabulous!!!!!


  • 10 oz frozen spinach thawed, squeezed, drained
  • 9 oz artichoke hearts chopped, squeezed, drained (i used canned)
  • 1/2 cup Romano cheese (i used the Kraft brand 3 cheese Parmesan sprinkle stuff)
  • 4 oz shredded mozzarella cheese
  • 4 oz (1/2 brick) cream cheese softened
  • 1/2 cup sour cream
  • 1 egg
  • 3 cloves fresh garlic minced
  • 1 medium yellow onion chopped
  • 2 tablespoons olive oil
  • 1 tablespoon olive oil (for skillet)
  • 1/4 tsp black pepper

  1. preheat oven to 375 degrees.
  2. in skillet, saute onions and garlic until nearly brown and transparent.
  3. in a bowl, mix together egg & oil until well emulsified.
  4. add cream cheese and sour cream and mix well.
  5. fold in remaining ingredients, including sauteed veggies.
  6. spread in 2-3 quart casserole dish and bake for 25 minutes.
  7. serve with pita, tortilla chips or crackers.

11/3/09

what's for supper tonite?


this is a huge favorite around here. the original recipe for the steak can be found in the better homes and garden (red & white checkered) cookbook and the potatoes are my own creation.

the potatoes

1. chop enough russet (white) potatoes to cover the bottom of a 9 X 13 glass baking dish. it's about 8 cups by my measuring bowl.

2. in a small bowl mix together

2 T chili powder
1 tsp paprika
1 tsp dried minced onion
1/2 tsp onion powder
dash of garlic powder
1-2 tsp salt

(store bought taco seasoning will work - use enough for 2 lbs of burger)

3. drizzle olive oil into the bowl with the potatoes. you want enough to coat the potatoes, but you don't want oil pooling in the bottom of the bowl. stir until all surfaces are well coated.

4. add seasoning to oiled potatoes and stir until evenly coated with seasonings.

5. pour into baking dish. bake for 45-60 minutes at 450 degrees (or until fork goes through potato easily).


the steak

1. take a 2-3 lb round steak and trim the hard fat from the edges and beat out flat with a tenderizer mallet until half the thickness you started with (or less if you can manage.)

2. shape and trim as necessary to make a rectangle or some facisimile thereof.


3. sprinkle with chosen seasonings. i often use crushed corn flakes, parmesean, Italian seasoning, salt and pepper, but tonight i used cheese powder and bread crumbs because that's what i had in the cupboard.

4. layer with well-drained canned or thawed, frozen spinach.

5. roll like a jelly roll and secure with toothpicks. (see hubby's video.)


6. slice into 1-inch thick steaks.

7. place on broiler pan and broil on high for 7-10 minutes on each side.


8. remove toothpicks and serve.

10/19/09

Italian wedding soup


this is one of my favorites. i learned how to make it a couple of years ago from another recipe i found, but my recipe is actually much simpler than the one i had and in my opinion tastes about the same (but better) than the stuff campbell's puts out.

meatballs:

1 lb ground turkey (or beef)
2 eggs
1 cup bread crumbs
1/2 cup Parmesan
1 tsp Italian seasoning

mix all ingredients together, meatloaf style. roll meatballs to preferred size 1/4 to 1 inch depending on my mood.

soup:

6 cups chicken broth (sometimes i use beef)
4-6 cups water (depending on the concentration of the chicken stock)
2 cups frozen spinach (little box from freezer section)
1 cup small unprepared pasta (i use orzo, O's, stars, or whatever is handy)
1/3 cup shredded carrots (optional - i usually don't have any)
1 medium (yellow or white) onion chopped (or 2 tsp onion powder)
3 cloves garlic minced (or garlic powder to taste)
2 tsp celery seed
1/2 tsp salt
1/2 tsp black pepper

boil broth. add seasonings and taste to see how much water to add. if too fatty tasting, add water until desired consistency is reached. add meatballs and allow to boil for 5 minutes or so to give them a head start. then add all other ingredients and cook according to the pasta directions or until pasta is desired tenderness.

we serve with white (Asian) rice and Korean hot sauce, but it's tasty right out of the pot. also good with crackers.


4/19/09

how to make eggrolls

I got a new camera for Christmas last year and it's been fun using it. I love to make eggrolls and my family loves to eat them, so I decided to dig out the new camera and share with you how I do it around this kitchen.

NOTE: i no longer use the recipe below. i use the same tips, tricks and methods, but i've since learned a few new tricks and i only use this recipe now.

I normally make smaller batches, but I came by a large amount of cabbage, so I went for broke and made extras for the freezer. I'll be basing my recipe on the BIG batch.

4-6 lbs of cabbage shredded
4 lbs of ground pork (not sausage)
1-2 large yellow (or white) onions
6-10 cloves of fresh garlic
black pepper

~~~~~~~~~~~~~~~~~~~~~~~~
(click on images to enlarge)

1) Chop onions and garlic fine and brown in skillet or large pot with the pork until done through. (do not drain)
2) Shred cabbage either by hand or in food processor (slice setting seems to work best).

3) Put cabbage in large pot or bowl and poor pork with fat into the cabbage.
4) Add pepper and mix well.
5) Allow to sit for a few minutes on the counter and the hot pork fat will begin to soften the cabbage to make it easier to work with.

6) Lay eggroll wrappers flat on table diagonally.
7) Place a small handful (maybe 1/3 cup) into the lower center of the eggroll wrapper.


8) Fold sides towards the middle like an envelope.


9) Pull the bottom corner up to the top and press and pull back to pull the filling towards you and help contain it in the wrapper.


10) Dip fingers in a small bowl of water and wet the top corner of the wrappers.

11) Crimp any ends that might be loose or flopping and roll away from you.


~~~~~~~~~~~~~~~~~~~~~~~~
Tears & Holes (they happen)


Don't panic! I do this all the time. If your eggroll gets a little too wet or stretched, it might tear. Do the best you can to roll it up without damaging it further. Then tear a small corner off another wrapper (you won't even miss it). Wet this small piece and slap it over the hole like a bandaid. This will either fry solid in the fryer or freeze dry in the freezer.
~~~~~~~~~~~~~~~~~~~~~~~~

12) If you intend to freeze, lay them on a cookie sheet in a single layer NOT touching.
13) Place in freezer until frozen.
14) Remove from freezer and cookie sheet and put in freezer-safe container and return to freezer until you are ready to use.


15) Heat fryer to 400 degrees.
16) Place eggrolls in fryer for 8 minutes. They tend to float, so I recommend you place your basket on top of the eggrolls and put the lid on top of the basket to keep them fully submerged. This will ensure that all sides are equally cooked without extra fuss.


17) Remove from fryer and drain.


18) For a tasty dipping sauce, mix 1/2 white vinegar and 1/2 real soy sauce and throw in some toasted sesame seeds if you have them.


19) Serve with rice and enjoy.


~~~~~~~~~~~~~~~~~~~~~~~~


Below is a video on how to roll up the eggroll. This mine and hubby's first movie. Hope you like it. It's rated "B" for beginners.

4/11/09

for lunch today


Chicken & Spinach Parmesean

~ 4 cups of chicken already cooked
(I made stock yesterday and used the scraps)

~
1 lb of pasta

~
2 1/2 cups milk

~
1/2 to 1 cup Parmesan
(I was a bit short today but it was okay)

~
1/2 to 1 tsp salt

~
1/2 to 1 tsp black pepper

~
4 T butter

~
4 T flour
(I used hard red wheat)

~
box of frozen spinach
(thawed and drained ~ or equivalent)

Cook pasta according to the instructions, drain and rinse. In another pan, put butter, flour, pepper and salt together and make a roux. If the roux is too dry, add a pat more butter. Allow the roux to get nice and bubbly without scorching and add the milk and the parmesean and simmer while stirring constantly until thickened. Add chicken and spinach and mix until warmed through. Fold in noodles and serve.
disclaimer:  caution must be taken when reading my blog.  i'm a new creature and the Lord continues to mold and shape me through his will.  older entries may seem to contradict the newer ones.  there's a pretty good chance that they do for two reasons.  first, because of my nature, as i strive for perfection, i will continue to fall short of the mark and should therefore be thankful for his grace and should seek his (and your) forgiveness for having been so foolish in the past.   second, i continue to grow in him; and as changes are made, i have made attempts to change my blog to reflect those changes. in this event, please refer to #1.   if you're interested in perfection, my blog isn't the place to be.  pick up a king james bible (yup, i'm one of THOSE people) and read his PERFECT word.